Upcycle Cookie Wrappers into Chic Dresses

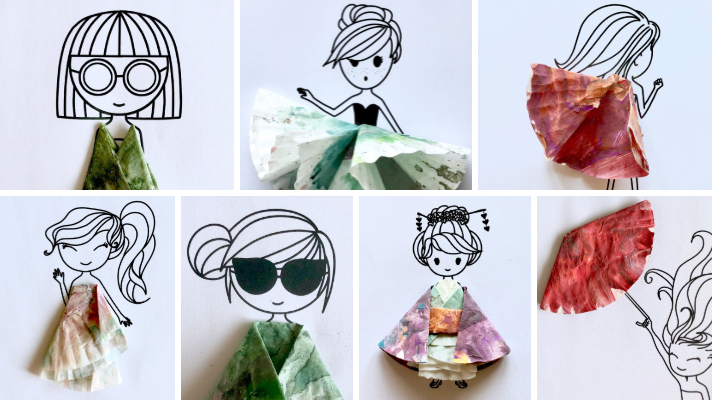
The Dumpling and I recently binged on a tin of Danish butter cookies—if you have never had them, they’re dangerously addictive. Within days, we finished the entire box and were left with a few dozen white wrappers that were too good to just toss out. Instead we painted and turned them into dresses!

My Post copy

Materials

Directions

Print the illustrations.

img_6776

The drawings are scaled to fit the butter cookie wrappers. If they do not fit the wrappers/liners you’re using, scale the images up (or down) in the print settings by adjusting the percentage in “Custom Scale” option. For example, enter a value between 101% to 200% to enlarge, or 1% to 99% to shrink.

custom print scale.jpg

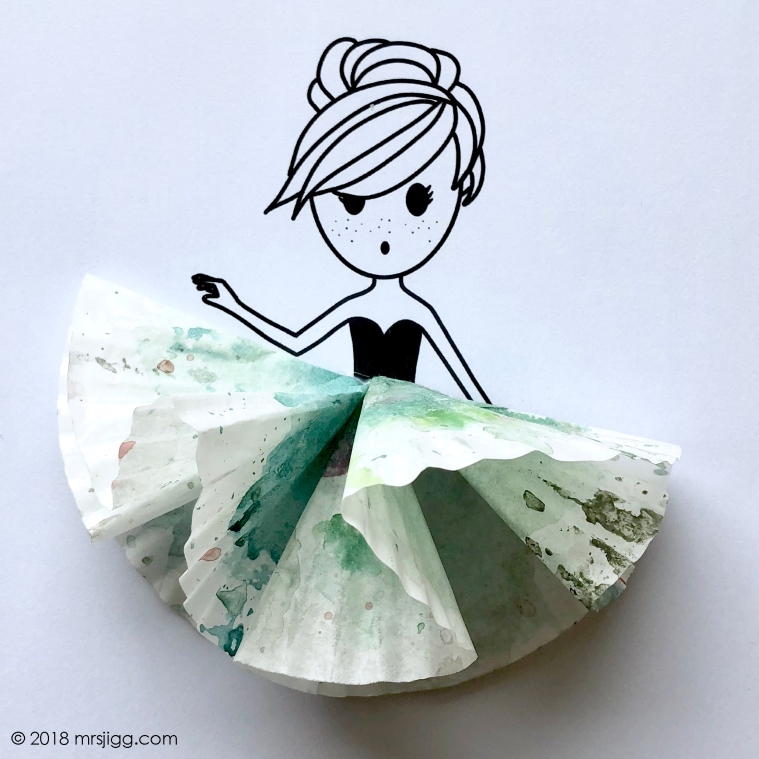
Paint the cookie wrappers. While we used craft paint and watercolors, any medium can be used. The former produced vibrant colors but left the wrappers stiff and crusty (therefore, hard to fold). The latter created softer effects but the wrappers ripped easily when it was wet.

Experiment with different folds to create the outfits. We started with folding the wrappers in halves, quarters, and sixths to make dresses and skirts, but eventually ventured into asymmetrical combinations.

Our Look Book

Skirts/Dresses

IMG_6783IMG_6789IMG_6793

Poncho

IMG_6790

Kimono

IMG_6787kimono

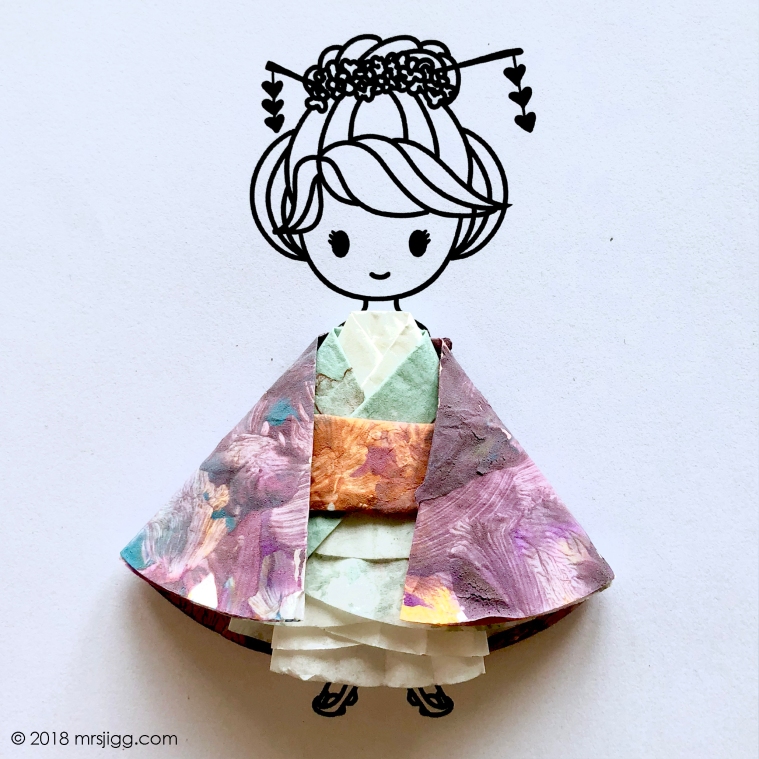
The kimono, composed of four wrappers, was probably the most complex. The first is the bottom-most layer that creates the white collar; the second is the actual kimono; the third forms the sleeves; and the fourth is the sash.

Instructions for the first and second layers:

  1. Fold the wrapper into unequal halves. The greater the disparity, the longer the dress.
  2. Make approximately a 1/4″ horizontal fold from the top to form the collar.
  3. Flip the wrapper over. Fold the left and right sides toward the center, dividing the wrapper into thirds with the middle section being the largest.

Instruction for the obi: Continue folding the wrapper into horizontal halves until you get the desired width.

Instructions for the sleeves: Fold the wrapper into unequal halves. Then fold the left and right sides toward the center, with the middle section being the largest.

Umbrella

IMG_6792

Superhero cape

IMG_6777

Seven Summer Fruit Art For Kids

To celebrate the arrival of summer, the Dumpling and I created an art series featuring a few of our favorite summer fruits! We experimented with a different technique for each—from making paper mosaics to coloring with makeup to stamping prints out of various household materials. While we did the activities side-by-side (with me adding the finishing touches), the dissimilarities in our work are quite telling of how differently we approach each task!

1. Paper Cutout Watermelon

Paper cutout watermelon.

Directions:

Although this was a straightforward activity, working with my two and a half year old brought an interesting twist because her imagination isn’t yet fully bound by how a watermelon (or anything really) is supposed to look like. As a result, our compositions were as literal or abstract as we wanted it to be.

2. Paper Mosaic Pineapple

IMG_5469(Edited).jpg
Paper mosaic pineapples.

Directions:

  • Print the pineapple template.*
  • Cut yellow and green colored paper into approximately quarter inch tiles. Optional: Use different shades of the same color to create contrast.
  • Glue or tape colored the pieces on. (I used double sided tape.)

This was a perfect example of how the Dumpling and I diverge in interpreting directions—of me giving them and of her following. Instead of placing the pieces one-by-one, she just dumped everything on. It didn’t create the pixelated effect I was aiming for, but she did complete the activity…and it does look like a pineapple.

3. Thumb Print Strawberries

Thumb print strawberries.

Directions:

  • Apply lipstick (paint or stamp ink would work as well) on your thumbs and stamp to create heart-shaped prints.
  • Outline the prints with a mixture of rounded triangles and hearts.
  • Add leaves and speckles for seeds.

4. Wine (or Juice) Stained Grapes

Wine stained grapes.

Directions:

  • Download the grape template* and color each grape with blue, red, and/or purple watercolor pencils.
  • Blend colored grapes with a brush using red wine or juice (instead of water).
  • Drip red wine or grape juice onto the drawing for added effect. If you don’t have a dropper, soak a cotton ball and squeeze the liquid out onto the paper.

(This was a solo activity because I was that possessive of my wine…and I didn’t have grape juice.)

5. Bottle Cap Stamp Cherries

Bottle cap stamp cherries.

Directions:

  • Apply red paint on water a bottle cap and stamp.
  • Add stems and leaves on the berries after the paint dries.

Midway through our fruit series, I realized that I’m learning from the Dumpling as much as she’s learning from me. While I was carefully laying the cap on my sheet of paper in attempt to create perfect circles, the Dumpling just slathered a ton of paint on and stamped away. She used both ends of the bottle cap, creating a combination of outlined and colored-in circles—it was something that I didn’t think of until she showed me!

6. Pom Pom Smash Blueberries

Pom pom smash blueberries.

Directions:

  • Soak pom poms into blue and purple paint and smash them with a toy hammer. To limit the splash radius, cover the pom poms with clear plastic wrap.
  • Draw star on the berries to from the calyx once the paint dries.

7. Bubble Wrap Print Raspberries

Directions:

  • Cut a piece of bubble wrap into an oval-ish shape and glue onto a large beverage cap.
  • Apply pink and/or red paint onto the bubble wrap and stamp.
  • Draw circles to form drupes once the paint dries.

Like the cherry bottle cap printing exercise, the Dumpling’s unstudied approach uncovered another technique that didn’t occur to me. She just stamped and re-stamped over and over again—often on the same spot, which gave her raspberries a layered effect!

This project taught me that I should act more like a kid sometimes. I tend to over-think, over-plan, and over-analyze…while my toddler just does it. She keeps trying and experimenting until she runs out of paper or paint, whichever comes first. While my artwork often turned out as expected, the Dumpling’s carefree method often led to serendipitous effects. In the end, it was my toddler who taught me a thing or two!

* The printables look differently than my photos because my fruits were all initially free drawn; the templates were created after.

Turn Your Child’s Artwork Into Colorful Text Prints (Part 1)

I recently created a bunch of alphabet coloring sheets for the Dumpling, and we went on a coloring rampage with all sorts of materials—watercolor, chalk, craft paint, shaving cream, etc. I thought her application and choices in colors were spot on, so I cleaned up a few of her pieces in Photoshop (I helped her “color within the lines”) to create these beautiful alphabet prints!

IMG_4722

I received several inquiries on how the prints were created, and I was bummed out to tell others that they needed Photoshop. To make the project accessible to those who don’t have the program, I made two “electronic stencils” so they could be layered over existing artwork to replicate the same effect in PowerPoint. Since I needed “abstract” pieces for this method, it turned out to be a great way to give a few of the Dumpling’s old paintings a second life!

Alphabet-Stencil-Preview


Learn how to create them in PowerPoint by first downloading my “electronic stencils” and then watching my video tutorial below. I’ll demonstrate how the stencils are created from scratch in my next post!


Downloads

Alphabet Print Video 14
Electronic Stencil – Lowercase Alphabet
Alphabet Print Video 14
Electronic Stencil – Uppercase Alphabet

Create a Custom Coloring Sheet in PowerPoint

One of my favorite activities to keep my two year old busy is coloring: I strap her into a highchair away from walls and other furniture, layer my dining table with a large plastic bag, and let her go at it.

Instead of buying coloring books, however, I typically make my own because I can tailor the graphics to my toddler’s interest—which lately has been the alphabet.

img_4780

Creating a coloring sheet is actually quite easy in PowerPoint. Yes, PowerPoint—a program that typically comes bundled in our Microsoft Office! Check out my video* below for a quick tutorial. Print a bunch for the next rainy day activity or personalize it with someone’s name for your next gift bag stuffer along with a box of crayons!

* It’s my very first video tutorial! Any feedback would be greatly appreciated!

A thought about the typefaces

One of my biggest pet peeves with children’s books, especially those that try to teach the alphabet, is their choice in typeface. Many popular ones use the two-story lowercase “a” and “g” for legibility reasons, but this could be confusing for pre-schoolers who are learning to write the one-story version. While it’s not a big deal with older kids and adults, the Dumpling and I definitely have had disagreements about this. Therefore, I tend to stick with Century Gothic as it has the one-story “a” and “g.” Comic Sans is another one that often comes pre-packaged with Office…laugh all you want, but kids actually like this!

a and g

Free Downloads

Click here to download the alphabet coloring sheets.

Inside My Two Year Old’s Toy Box: Quality Over Quantity (Part 2)

Despite my love for wooden toys, it’s not realistic for our family to escape plastic ones entirely. They are everywhere because the truth is that there is a lot to love about them—they’re affordable, easy to clean, and come in so many vibrant colors and shapes. These are the ones currently in our toy rotation because the Dumpling and I play with them so often!

Plastic Pit Balls

They are a huge crowd pleaser when we host play dates, but I normally keep just few out and hide the rest…otherwise they end up everywhere—under the couch, on the beds, inside the washing machine, etc. The balls are great for gross motor skill activities: we toss, roll, and kick them around the house since they’re too soft to do any damage.

IMG_4709
Play Idea 1: Paint the balls. This was a recent Earth Day activity we did with a blue ball and washable green paint.
Play Idea 2: Scoop the balls with a ladle. Variations of this busy activity include color sorting and walking across the room without dropping the ball.
Play Idea 3: Roll them down the stairs. I know this sounds asinine, but it kept the Dumpling entertained for solid 30 minute blocks when she was between 18 -24 months old. We also included other sensory balls of different size and weight and observed how differently each one moved.

Magnetic Doodle Board

I don’t let the Dumpling have free access to crayons or markers (for good reason), so we have a magnetic doodle board instead. It is a staple and has never left our toy box (our second one is currently on its last legs). We use it to free draw, review shapes, letters, and numbers, and have drawing contests!

Magnetic Foam Alphabet

Given the Dumpling’s obsession with the alphabet lately, we use this to review letters quite often.

Play Idea 1: Use the base board as a shape sorting puzzle.
Play Idea 2: Because the pieces are made of foam, they float and make great bath toys. Once they are wet, they also stick on glass!
Play Idea 3: Use the magnets as stamps on a magnetic doodle board.

Water Drawing Alphabet Flash Card Book

I love these water “magic” pens because they also provide mess-free coloring. While the Dumpling initially didn’t pay attention to the alphabet on top, she “colored” the pictures so often that they were always in her peripheral vision.

img_2851
Play Idea 1: “Clean” the animal/object. I give the Dumpling a wet sponge, and we make a game out of wiping the cards.
Play Idea 2: Match uppercase and lowercase letters. Did I ever mention that I love flashcards? I can arrange them any way I want and use however many I want. I usually start with four or five so my toddler doesn’t get overwhelmed and build up the difficulty level from there.

Duplo Sets

We love open-ended toys because our imagination is really the limit. The Dumpling just builds and builds and builds…I’m pretty sure she constructed something like the double decker couch once.

Cutting Food Set

The Dumpling loves pretend play in the kitchen, so I’m looking to replace the set (which was a hand-me-down) with a wooden alternative since she actually tried to lick some of these.

This wraps up what is currently in our toy box. I will continue to update what is in our rotation once we shake things up a bit!

When we have guests over, all of her toys slide neatly into our corner side table. Clean up is easy peasy! (Psst, our Grimm stacking rainbow is new!)

Inside My Two Year Old’s Toy Box: Quality Over Quantity (Part 1)

I recently purchased two sets of barn and jungle animals from a mom-and-pop store in Tsuen Wan. From the outside, they looked like the plastic toys used in zoo/farm/safari “pretend play” activities that I’ve been seeing all over Instagram, so I was pretty excited to open them when I got home. The moment I ripped off the packaging, however, I was overcame by a terrible chemical odor. Luckily I was able to toss everything out before the Dumpling knew of their existence. (I normally buy toys behind her back and always examine everything behind closed doors before letting her to play.)

After this debacle, I decided to phase out most of our plastic toys because I’m tired of researching whether something is BPA, PVC, or [insert whatever chemical name]-free. Even if the Dumpling is past the phase of putting everything in her mouth, anything that’s radiating a chemical odor cannot be good.

My goal is to slowly replace the Dumpling’s toy box with quality wooden toys. Although the market is smaller and more expensive compared to its plastic counterpart, I’m only looking to purchase a few sets—specifically those that are multi-functional, offer replay value, and, if possible, have resale value as well. (I purchased two used sets that are in great condition; one of the sellers disclosed that she bought it used from someone else!)

Our household has always enforced a strict toy rotation system where the Dumpling is only allowed two boxes of toys—I cannot stand the clutter, so it forces me to be more thoughtful of my purchases and makes the Dumpling’s responsibility of cleaning up more manageable (and therefore, she’s more likely to do it). Most importantly, it challenges both of us to think of playing with existing toys in new, creative ways. This ensures that everything in our toy box gets play time; those that don’t get replaced with “new” ones until they find their way back in rotation or get stored away once she outgrows them.

These are the wooden toys currently in our collection and the creative ways we play with them to ensure that we get the most mileage!

Wooden Threading Beads

The Dumpling currently has zero interest in learning to lace, so we have been using the beads as stacking blocks and puzzles.

IMG_4625(Edited).jpg
Play Idea 1: Use the beads as building blocks. I like the design of this set because of the flat surfaces (some beads are curved all around).
Play Idea 2: Create a pattern matching puzzle. I printed various pattern arrangements and tasked the Dumpling with finding the pieces to match. While I used Photoshop to create the puzzle cards, you can just take pictures of your own arrangements and print them out as 4″ x 6″ photographs (they’re perfect flashcard size for little hands).
Play Idea 3: Create a block puzzle. I cut a picture into squares to the size of the block and taped them on.  (Warning: The tape could ruin the paint!) The level of difficulty can be adjusted by customizing the number of blocks used—we started with four. Technically, I can also create up to six puzzles with a different picture on each face, but I kept it to one since we’re still on easy-mode. (Picture of animals from Freekpik.)

Wooden Animal Shape Sorter Pull Along Truck

This is the Dumpling’s favorite at the moment because the animal pieces are so cute!

IMG_4621(Edited)

IMG_4622(Edited)
Play Idea 1: Set up a “farm” and “safari” pretend play with other toy sets. (Yay, I finally did one!).
IMG_4617(Edited)
Play Idea 2: Create [more] shape puzzles by tracing the animal outlines onto a piece of paper.
IMG_4620(Edited)
Play Idea 3: Form an animal tower. Stacking the pieces is actually very hard because of their shape and weight! The Dumpling could only get to second row before knocking everything down in aggravation.

Wooden Magnetic Animal Puzzles

This was my first impulse wooden toy purchase, and in hindsight, probably my least favorite because there’s not much to do beyond solving the puzzle. It took the Dumpling a full afternoon to learn that she needed to flip all the pieces to face the same side, but she can now assemble everything in minutes. I guess that’s the problem with puzzles: they cease to be fun once the challenge is gone.

Play Idea 1: Create Frankenstein animals. While I like the silliness of the game, the Dumpling isn’t amused and “fixes” it every time.

Thats it for now, but I’m still looking to add two or three more sets. In the meantime, I will continue sharing new ways we play with our old toys…including the plastic ones I tend to keep in my next post!

Leaning Out: The Transition From Working Mom to Stay-At-Home Mom

“I’m retiring!”

That was what I told everyone back in New York when they asked me what I would be doing after relocating to Hong Kong. There would be no more waking up at 6:00 AM, three hour commutes, ten hour workdays, or chore-filled weekends. Most importantly, no more feeling guilty about spending more time in the office than I did with my own daughter. I had grand visions of us watching the sunrise from our oceanfront flat, brunching by the beach, and making Pinterest-worthy artwork together.

Watching the sunrise from our flat…check!

Like many trailing spouses that arrive in this city, I opted not to work so that jigg can focus on his job while I settle our family down. I never intended to become a stay-at-home mom: my goal was to spend more time with the Dumpling, not all of my time. It turned out that way, however, because there are no daycares in Hong Kong…something I didn’t know until I arrived. Anyone who has cared for young children would know that my plans for a perpetual vacation went out the window the moment I found that out.

This full-time mom gig is turning out to be the crappiest, and as cliche as it sounds, also the most rewarding job I ever had. On one hand, the Dumpling dictates when I wake up (which is now 6:30 AM instead of 6:00 AM), what we watch on TV, and basically what we do on most days. I often found myself counting down the minutes to her nap and bed times when she behaves like…well, like a two year old. Like the time she found a piece of dog poop in the sandbox. Or the time she insisted on taking the stairs up the hill to our apartment, changed her mind midway, and made me carry her the rest of the way. Or the time she made me look like a kidnapper because I had to drag her home from the playground.

The Dumpling is turning into a beach bum!

Then there were sweet moments—moments that I would have missed if I weren’t home, scattered in between that made me forget all the physical, emotional, and mental abuse that she put me through. During the last three months, I got to eavesdrop on her nonsensical conversations with herself, listen to her off-key rendition of “ABCs” on repeat, and do countless potty dances with her. It’s simultaneously annoying and heartwarming that she wants to play with me all the time (except when jigg is home, then I’m just chopped liver). I know these days won’t last; sooner or later, it would be me who wants to spend more time with her.

While I fulfilled one aspect of my life that was missing, it created a void in another. Walking away from my career felt like I threw away everything I have worked for in the last 32 years. In a time where “leaning in” is celebrated as the modern woman’s goal, “leaning out” seemed to be the antithesis of what I was taught. What was the point of my mother’s sacrifices so I can concentrate on school? Of me working so hard? Of my family, friends, and mentors investing so much time and effort in me?

For the first time since I was 14 years old, I no longer brought home a paycheck, which had served as a self-esteem booster and a measurement of success. It was also a social equalizer in our household because when I worked roughly as many hours and brought home just as much as my husband, it was hard for anyone to impose gender-based responsibilities on me (not that jigg ever did). I used to tell people what I did for a living with pride; now I’m just unemployed.

I miss working…not the hours, stress, or commute, but the opportunity to interact with smart people, be challenged, and thrive. There are ideas buzzing in my head that I wish I had more than just the Dumpling’s nap time to work on. For someone like me, I realized that I can never truly lean out. Currently, I’m trying to find fulfillment as an aspiring mommy blogger by combining motherhood, crafting, and skills from my former life.

My new boss (the Dumpling) is a hard-to-please dictator, my hours are longer, and I’m pretty much a one-woman team…so much for retirement!

Make a Doggy Layer Puzzle

These were the instructions that someone once used to teach me how to draw a dog:

Webp.net-gifmaker

My ten year old self thought it was the most awesome drawing tutorial ever! Actually, it’s still awesome because it’s the same set of instructions I give myself whenever I draw a dog today…which is often since it’s a regular request from the Dumpling.

I wanted to share the story with my toddler because this wisdom must be passed on to future generations! Having been tinkering with layer art recently, I thought making a layer puzzle would be a fun way to get her involved.

Materials

  • Printable template
  • X-Acto knife
  • Scissors
  • Seven sheets of cardstocks (Color choices are based on preference; I used black, beige, blue, white (2), light brown, brown)

Instructions:

Step 1: Print the template onto the cardstocks. 

  • Black: Layer 1 (Please note that I just hand wrote the title in with a marker.)
  • Beige: Layer 2
  • Blue: Layer 3
  • White: Layer 4
  • Brown: Layer 5
  • Light brown: Layer 6
  • White: Layer 7

Step 2: Use an X-Acto knife to cut out the shaded areas. I’m not that dexterous so I used scissors to clean up the frays and trimmed off any borders peeping from the previous layer(s).

Step 3: Layer the cutouts in numerical order and share the story! I also numbered the sheets so that the Dumpling can solve the puzzle on her own by applying her number sequence knowledge.

img_3903

Slide1Slide2Slide3Slide4Slide5Slide6

My Toddler Tells Me a Bedtime Story

The Dumpling’s imagination has been developing rapidly in the past month. Instead of only seeing objects as they are, she can now envision them as something else in her make-believe play. For example, she played with an iPhone box as if it was a car, saw a train in the shadow casted by our curtains, and re-enacted a scene from the Minions movie with a dinosaur cookie cutter and play dough.

Imagination is an important skill for a child to acquire because the ability to think creatively and differently builds a world of infinite possibilities—there’s always a new idea, invention, or method waiting to be dreamed up. While I don’t think there’s a surefire method to teach imagination like the way shapes, colors, letters, and numbers are taught, creativity is like a muscle—the more it’s used, the more it develops. Therefore, the best I can do as a parent is to look for opportunities for the Dumpling to exercise it as much as possible.

I have shared in my past entries that reading with the Dumpling has been an ongoing challenge in our household. Instead of forcing her to do something she didn’t want to, I actually packed her books away (quite literally since we were moving) and stopped bedtime stories for a few months. I recently reintroduced them back into our nightly routine…with a new twist. Instead of me doing the reading, I asked the Dumpling to tell me a story instead. She obviously cannot read yet, so I helped her string together a simple narrative by digging deep into our imagination.

We first created the characters using illustrations from “Goodnight Little Remy,” a personalized book that depicts various animals wishing the Dumpling a good night. The actual story, as the author intended, was entirely irrelevant; we just needed the visuals as a starting point. I facilitated by asking the Dumpling a series of questions about what her characters did or intend to do, how they feel, and what their relations are with each other…essentially anything that is not shown in the artwork.

The questions were all relatable to the Dumpling’s everyday life and her responses often reflected that. If she couldn’t answer (which was often the case at the beginning), I presented her with a list of choices to pick from until she nodded her head in agreement. Below are sample questions based on a spread featuring owls in the book.

  • “What is the owl’s name? Is it Bob? Kevin? Stuart?”
  • “Does the owl have a Mommy? Daddy? Brother? Sister? Friends?”
  • “Are the owls and birds neighbors? Are they friends?”
  • “How are the owls feeling? Are they happy? Sad? Hungry? Angry?”
  • “What did they have for breakfast? Banana? Apple? Kiwi?”
  • “Did the owls ride the train or go to the playground?”

Once we gathered enough details, I pieced together a story based on the Dumpling’s answers. After repeating this activity for a week (with multiple rounds of revision on her end), she was even able to tell me bits and pieces of her own story!

As I mentioned previously, the real story was not important. I never corrected the Dumpling by reading what’s printed on the text. My goal was to nurture her imagination, therefore, it didn’t matter if her tale defied the rules of physics, space, and time. I’m pretty sure there will be many people in her lifetime that would tell her that her ideas are impossible—I’ll try not to be one of them.

Goodnight Little Remy
Retold by the Dumpling (with help from mommy)

There was a sleeping bird who flew across the night sky, over an empty house where an old grandpa once lived. The sleeping bird watched fireworks and visited a bird family. There was a Daddy Bird (because he’s big), Mommy Bird (also because she’s big), Brother Bird, Sister Bird, and Baby Bird. There was also a Friend Bird who will grow up to be a dinosaur. RAWR! The Friend Bird was very popular because he had multiple girlfriend birds.

The Baby Bird lived in a nest with two other eggs, but the eggs would become the Dumpling’s snack when she gets hungry. Nom! Nom! Nom!

All of the birds like going to the playground and down the slide with their friends and neighbors, the owls! The owl family has a Daddy Owl, Mommy Owl, Brother Owl, Sister Owl, and Baby Owl. The owls were not happy because they didn’t love each other.

The end.